Slayers 2 Dungeon Guide: Master Ouwigahara & Get V2 Weapons
Master Ouwigahara with our Slayers 2 dungeon guide. Learn best cards, V2 weapon crafting, and scoring strategies to level up your character fast.
Updated:
Video Guide
THE ULTIMATE PROJECT SLAYERS 2 DUNGEON GUIDE (Best Cards, Builds & Strategy)Table of Contents
Entering the Ouwigahara dungeons is the defining moment for any player reaching the mid-game in this Roblox hit. This slayers 2 dungeon guide will walk you through every essential mechanic, from the initial level requirements to the complex card synergies needed for a high-score run. Whether you are looking to farm mastery or craft the elusive V2 weapons, understanding the dungeon loop is mandatory.
Dungeons in this game act as the primary engine for late-game progression. As you follow this slayers 2 dungeon guide, you will discover that survival is only half the battle; the real challenge lies in manipulating point multipliers to maximize your rewards. By the time you reach the end of this article, you will have a professional-grade strategy for soloing or squad-clearing the toughest floors Ouwigahara has to offer.
Quick Answer
This guide covers ordinary Ouwigahara progression. Togane’s recorded forge quest displays Lv65. Unlock the portal, bring a usable combat kit, and read each card’s effect and duration. Spend earned tower points on the reward you actually need; check the Forge recipe separately rather than assuming 90,000 points pays for every V2 weapon.
Getting Started: Requirements and Unlocking the Portal
Before you can step foot into the dungeon, you must meet specific progression milestones. The community generally agrees that attempting dungeons before you are ready is a waste of time and resources. According to player reports, the absolute minimum level to enter is 65. However, level alone isn't enough; you need a kit that can handle crowd control.
How to Unlock the Dungeon
To unlock the dungeon, head to the Hidden Mist Village and locate Blacksmith Togane. He will give you a quest regarding his "other forge." You will need to travel toward the bridge near the Forgotten Ruins (past the Rengoku area). Once you cross the bridge and follow the linear path through the torii gates, you will find the purple portal. Interacting with this portal registers it to your hub, allowing you to queue for Ouwigahara Normal directly from the main menu in the future.
Preparation Checklist
Do not enter empty-handed. Dungeons scale in difficulty quickly, and your basic M1 attacks will become obsolete by the time you hit the middle floors.
Requirement
Details
Why It Matters
Level
65 Minimum
Unlocks the quest and basic stat scaling.
Abilities
2+ BDA or Breathing Moves
Prevents you from being overwhelmed by mobs.
Supplies
Health Elixirs
Essential for long runs; buy these in the lobby.
Weapon
Check Damage Factor
Your base weapon stats carry your early-floor damage.
The Card System: Prioritizing Multipliers and Stats
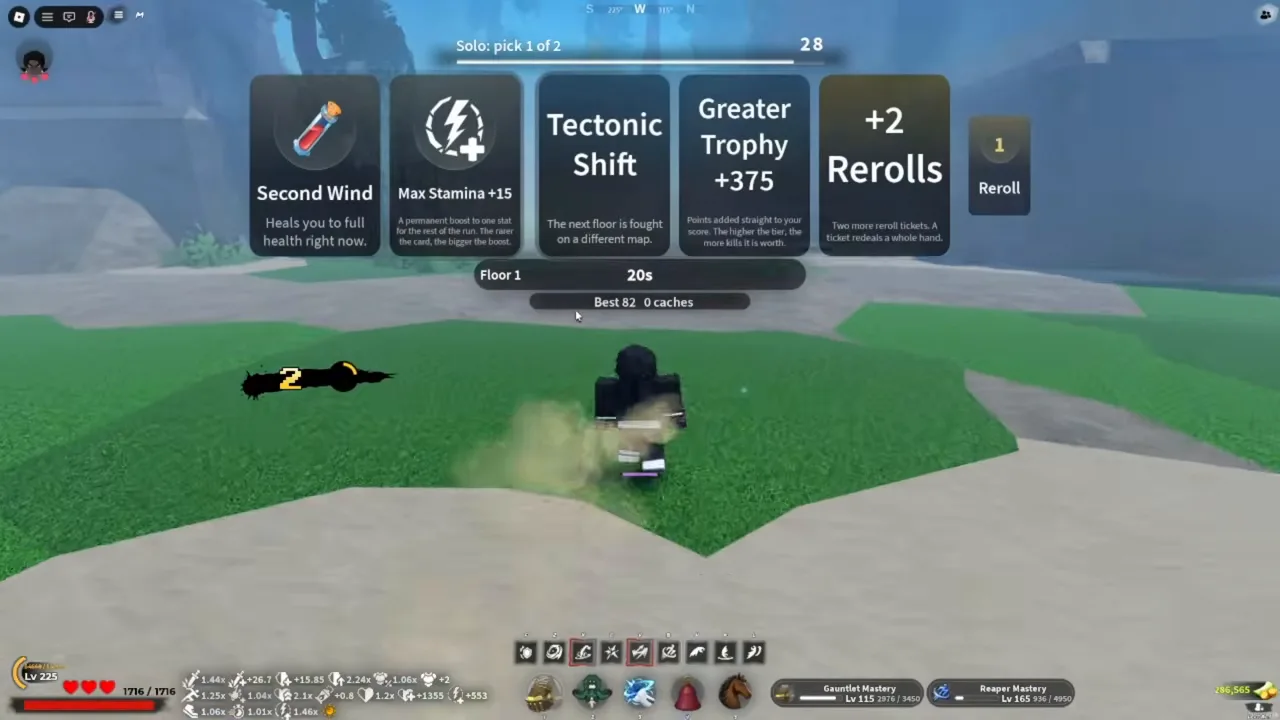
The card system gives you choices that can change stats, score, recovery or a later floor. Check the full description before selecting: a lasting bonus and an immediate heal solve different problems.
Read the Card Before Choosing
Separate effects that last the run from effects that trigger immediately or only affect the next floor. In an inspected card screen, Max Stamina +15 lasts the run, Second Wind heals immediately, Greater Trophy +375 adds points directly and Tectonic Shift changes the next floor’s map. These are recorded examples, not fixed values for every future draw.
Choose survival if you are close to dying; choose a lasting damage or stamina improvement when it solves a recurring problem. Direct points can be useful when your build already clears reliably. The previous fixed multipliers for Ascension and Blood Moon, and the claim that every short-duration card is inferior, are not established by those screens.
Stat Priority Table
When you aren't offered a point multiplier, you should pick stat cards based on this priority list:
Priority
Stat
Reasoning
1
Damage (%)
Faster kills prevent you from taking unnecessary hits.
2
Max HP
Vital for surviving the Wave 60+ power creep.
3
Cooldown Reduction
Allows for more frequent ability spam for crowd control.
4
Damage Reduction
Stacks with HP to make you tanky in the late waves.
5
Block Points
Useful if you prefer a defensive, parry-heavy playstyle.
Check Movement Penalties
If a card removes movement options you rely on, compare its benefit with the escape routes you would lose before accepting it. Attack speed and movement speed are situational: judge them by your weapon, abilities and positioning rather than treating them as universally inferior.
Combat Strategy: From Wave 1 to Wave 60+
Your gameplay style must evolve as the dungeon progresses. This slayers 2 dungeon guide breaks the run into three distinct phases based on enemy scaling and resource management.
Phase 1: The Early Grind (Waves 1-20)
In the early waves, focus on conserving your stamina and ability cooldowns. You can safely rely on M1 combos for most standard mobs. Save your Breathing or Blood Demon Art moves for the "Yellow Highlighted" elite NPCs and any boss encounter announced by the floor.
Phase 2: The Mid-Game (Waves 21-59)
At this stage, enemies begin to deal significant damage. You should start integrating your moves more frequently. If you have a move with "Hyper Armor" or large "Crowd Control" (CC), use it to group enemies together. This speeds up the floor and reduces the chance of getting infinite-comboed by a group of mobs.
Phase 3: The Power Creep (Wave 60+)
Once you hit Wave 60, the game changes. The NPCs receive a massive boost to their stats. Community reports suggest that M1 attacking at this stage is a death sentence. You must switch to a "Hit and Run" or "Ability Spam" strategy.
Solo Strategy: Cycle through your CC moves and stay mobile.
Squad Strategy: Have one player act as a tank/distractor while the others unload high-damage ultimates.
The Dungeon Shop and Reward Spending
Use the reward lobby to review the points earned and the purchases available. Spend the points you intend to use before leaving or queuing again; the inspected shop screens do not establish how the balance behaves after reconnecting.
Where to Spend Your Points
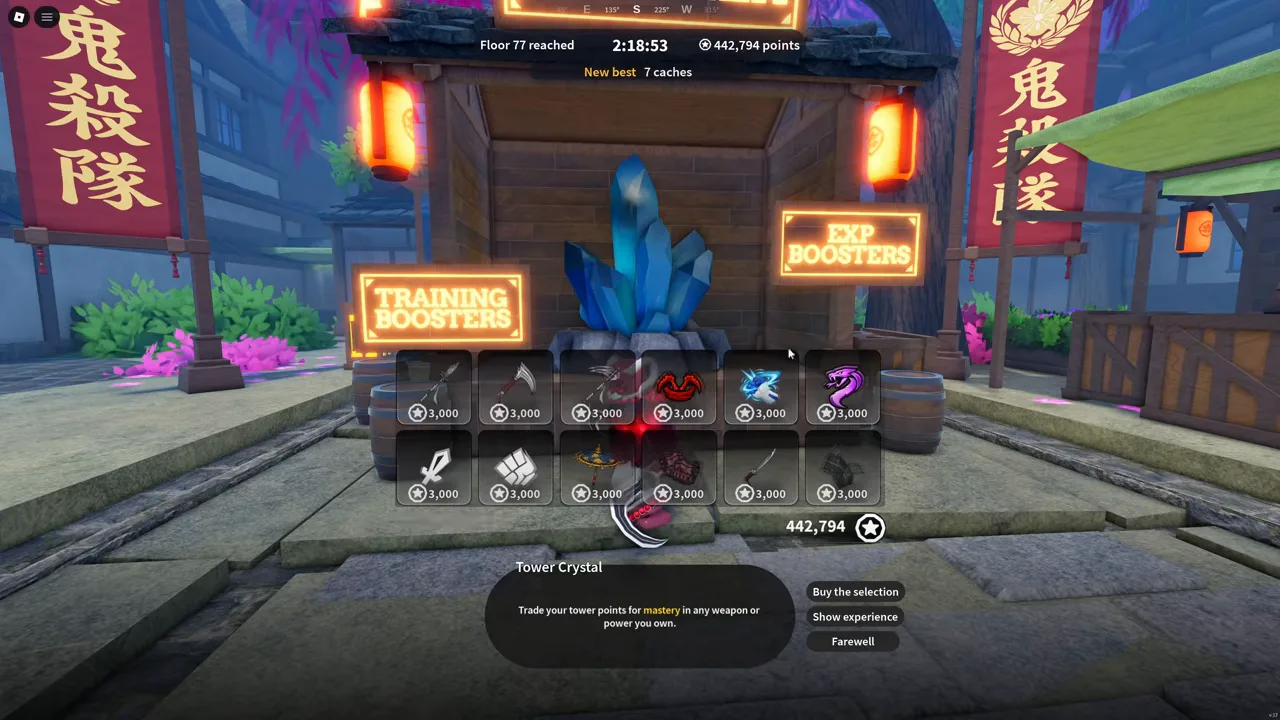
The Tower Crystal interface explicitly trades tower points for mastery in a weapon or power you own. Check the selected icon before purchasing so the reward goes toward the track you intended.
Reward
What the inspected interface shows
Spending decision
Mastery
Tower Crystal offers separate training options
Buy for the weapon or style you are developing
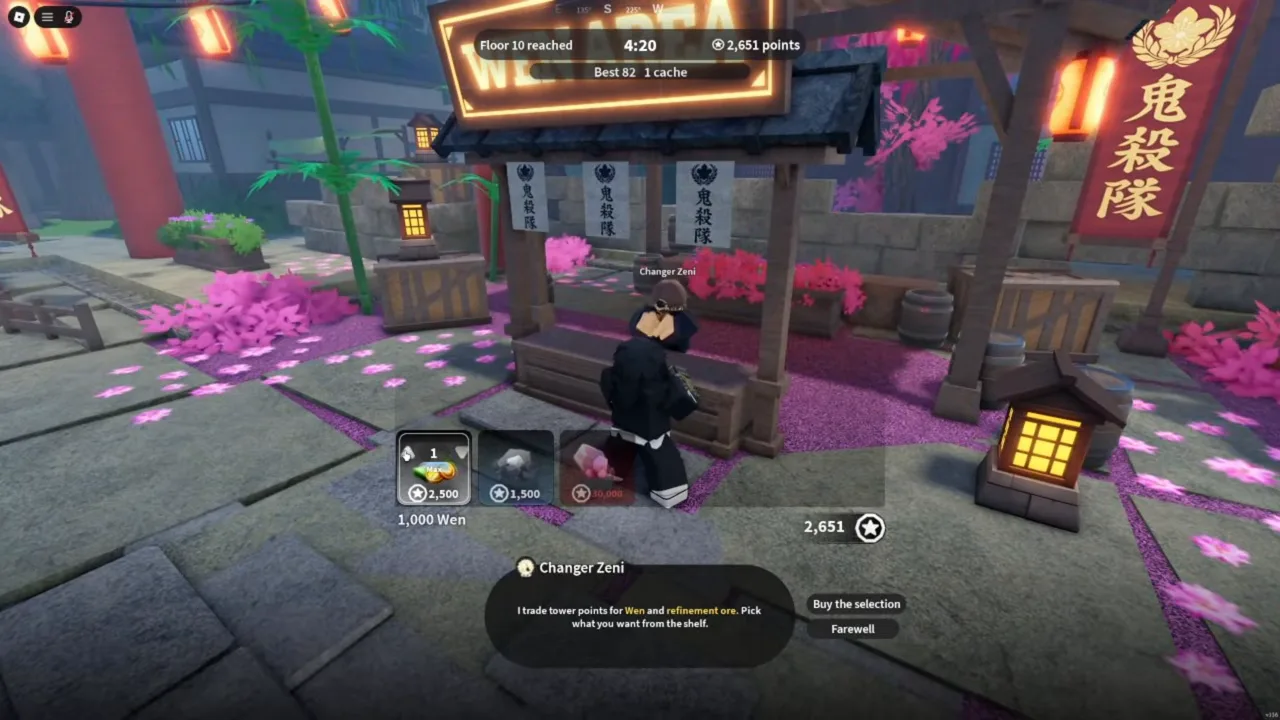
Wen and Refinement Ore
Changer Zeni exchanges tower points for these rewards
Compare the selected item and currency icon before accepting
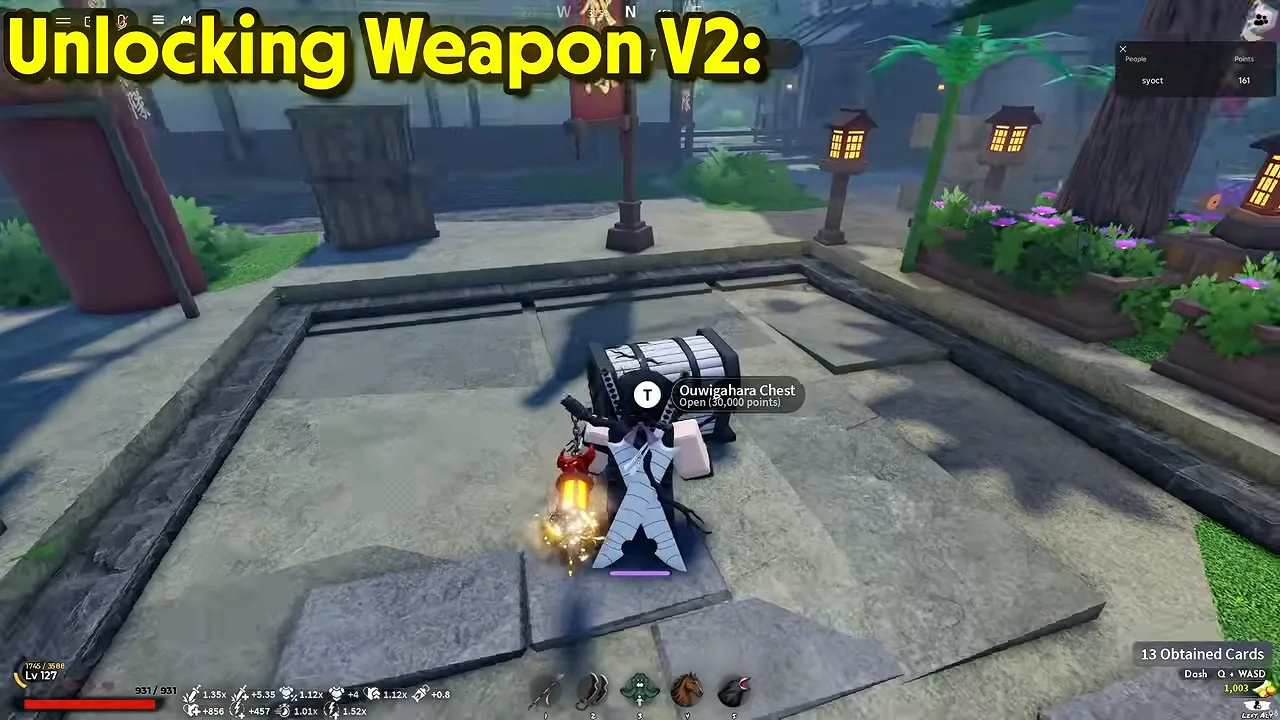
Ouwigahara Chest
An inspected prompt reads 30,000 points to open
Treat that as a recorded price; check your current prompt
The Changer Zeni screen distinguishes the tower-point balance from the Wen received. The chest prompt does not prove a particular accessory drop rate. These screens were reviewed on October 14, 2026; their prices are not a guarantee against later changes.
Crafting V2 and Finding Secret Schematics
Open the recipe for the exact weapon and tier you want before committing your points. Record the required base item, currency icon, materials and quantities. Tower points used at the reward NPCs are not interchangeable with Wen, and this guide no longer treats 90,000 points, 500 scraps, 300 threads and 10 ores as one universal V2 recipe. Keep crafting materials until you have checked that recipe.
If mastery is limiting your move unlocks, training may improve the next run. If you are saving for a craft, compare the missing ingredients with your inventory before buying a chest or converting points.
Firstlight and Nightfall Weapons
While V2 weapons are crafted, "Firstlight" and "Nightfall" variants are often found via hidden schematics or complex puzzles across the map. For example, the Nightfall Sickles require you to pull 10 levers scattered across the world (Hidden Mist, Windy Peaks, Snow Village, etc.) in a single server session. The Sound Cleavers schematic is found at the end of a difficult parkour maze in the Snow Cave, guarded by Duelist Hibiki.
A common question in the community is whether to run Ouwigahara alone or with a party. Based on current meta analysis, both have pros and cons.
Solo Advantage: You can plan your own choices and movement without coordinating another player.
Group Advantage: A coordinated team can spread pressure and chain crowd control. Compare the actual time and score for your group rather than assuming an unverified multiplier interaction.
Choose the format in which you can complete reliable runs. There is no tested universal party size that maximizes every build’s score or material income.
FAQ: Slayers 2 Dungeon Strategy
How do I get more points in a single run?
Compare the effect, duration and risk of the cards actually offered. Lasting buffs can help across many floors, but healing or a direct point reward can be the better choice for your current run. Record the final score and time instead of assuming a verified compounding formula.
What is the best level to start doing dungeons?
While the minimum requirement is level 65, many players find it more efficient to wait until they have at least three abilities unlocked. Entering with only M1 attacks makes the process slow and increases the risk of dying to the first boss.
Do my dungeon points carry over to the next game?
Do not plan on carrying an unspent balance across runs. Make your intended purchases before leaving the reward lobby. Point persistence after reconnecting has not been independently reproduced for this guide.
How do I get Mythic Refinement Ore faster?
Check the selected ore at Changer Zeni and the material returned by a salvage offer before spending. An item’s rarity alone does not establish which ore it returns, and there is no measured comparison here proving that salvaging is always faster than earning dungeon points.